How to use an Eggtimer Classic (3/12/2022)
Context: Despite on our rockets we have considerable advanced avionics in the form of things like Ricardo, Pickle Rick, etc. There is still a need to include some form of COTS electronics as a back up in the event that the SRAD electronics fails.
Introduction: There are many COTS flight computers available. The following just highlights one of them. Eggtimer rocketry are favoured for making affordable flight computers that are allegedly really easy to use and rather affordable. An interesting knack about them is the fact that they can be purchased in 2 forms: (A) Fully Assembled and Tested or (B) as a bunch of components that you have to assemble yourself. The latter option is cheaper, naturally; however, it requires getting electronics to assemble it unless airframe and recovery have suddenly acquired any boffins who are really good at soldering. The eggtimer classic is the base range of the eggtimer flight computers. It has a special advantage in the fact that it is easy to use on all platforms and enables dual deployment amongst other things.
How to program an eggtimer?
When programming an eggtimer there are 2 main things that you should need to use an eggtimer for, for starters you need to be able to go and input your flight settings. And also to ground test your recovery mechanisms etc.
- What do you need to programme it?
- A USB to serial data cable (USB to 3 pin) (We've got a special one just for the eggtimer)
- An appropriate power source (A LiPo or a 9V generally, it all depends on the way that the power input was arranged)
- A suitable computer (Mac or Windows can both be used).
==================================================
Part 1: How to input flight settings.
---------------------------
1. Connect the eggtimer classic to your computer. When connecting the 3 pins to the eggtimer, make sure to connect them in the order shown in the below pictures. If not, it just won't work. The other end should be a USB that just plugs into your computer.


---------------------------
2. Connect your eggtimer classic to power (Be comfortable with step 3 before you do this step)
---------------------------
3. Access the editing terminal
(For Mac)
a. Open Terminal or iTerm, basically any sort of terminal editing app.
b. Paste “sudo stty -f /dev/tty.usbserial-1420 19200 && screen /dev/tty.usbserial-1420 19200”, the part tty.usbserial-1420 will change depending on which port you use on your computer. I have a MacBook Pro, and this corresponded to my top of 2 ports.
c. Press Enter
d. Enter your Password
e. It opens up the terminal.
(For Windows)
a. Download a software that can edit your baud rate (this is basically the rate at which your computer reads data), an example of this is PuTTY (https://www.chiark.greenend.org.uk/~sgtatham/putty/latest.html), which the following descriptions will talk about how to use.
b. Open the Arduino app on your computer under tools look at the ports that are available for your computer. There should only be one port highlighted if the eggtimer is the only thing connected to your computer. The name should be COM something. (This is a janky step, if you know the names of your ports already, or are willing to do trial and error those are fine.)
c. Open PuTTY
d. Navigate to the serial connection section.

e. Put in under Serial Line the COM something that you found from Arduino. And put speed as 19200
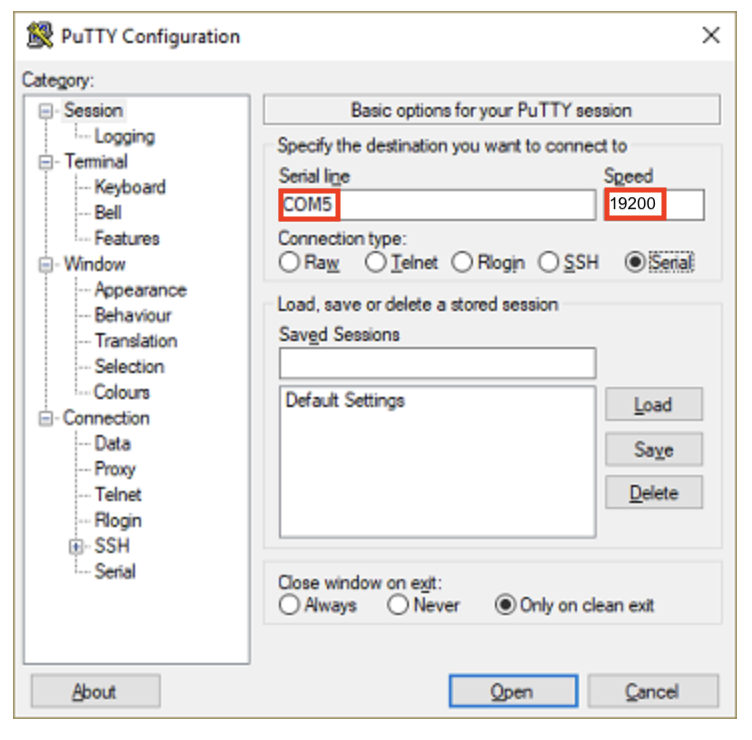
f. Press Open.
g. It opens the terminal.
---------------------------
5. You will hear beep-beep, this is good. Press Enter within 30 seconds of hearing the beeps to make sure that the flight computer doesn't enter flight mode.
---------------------------
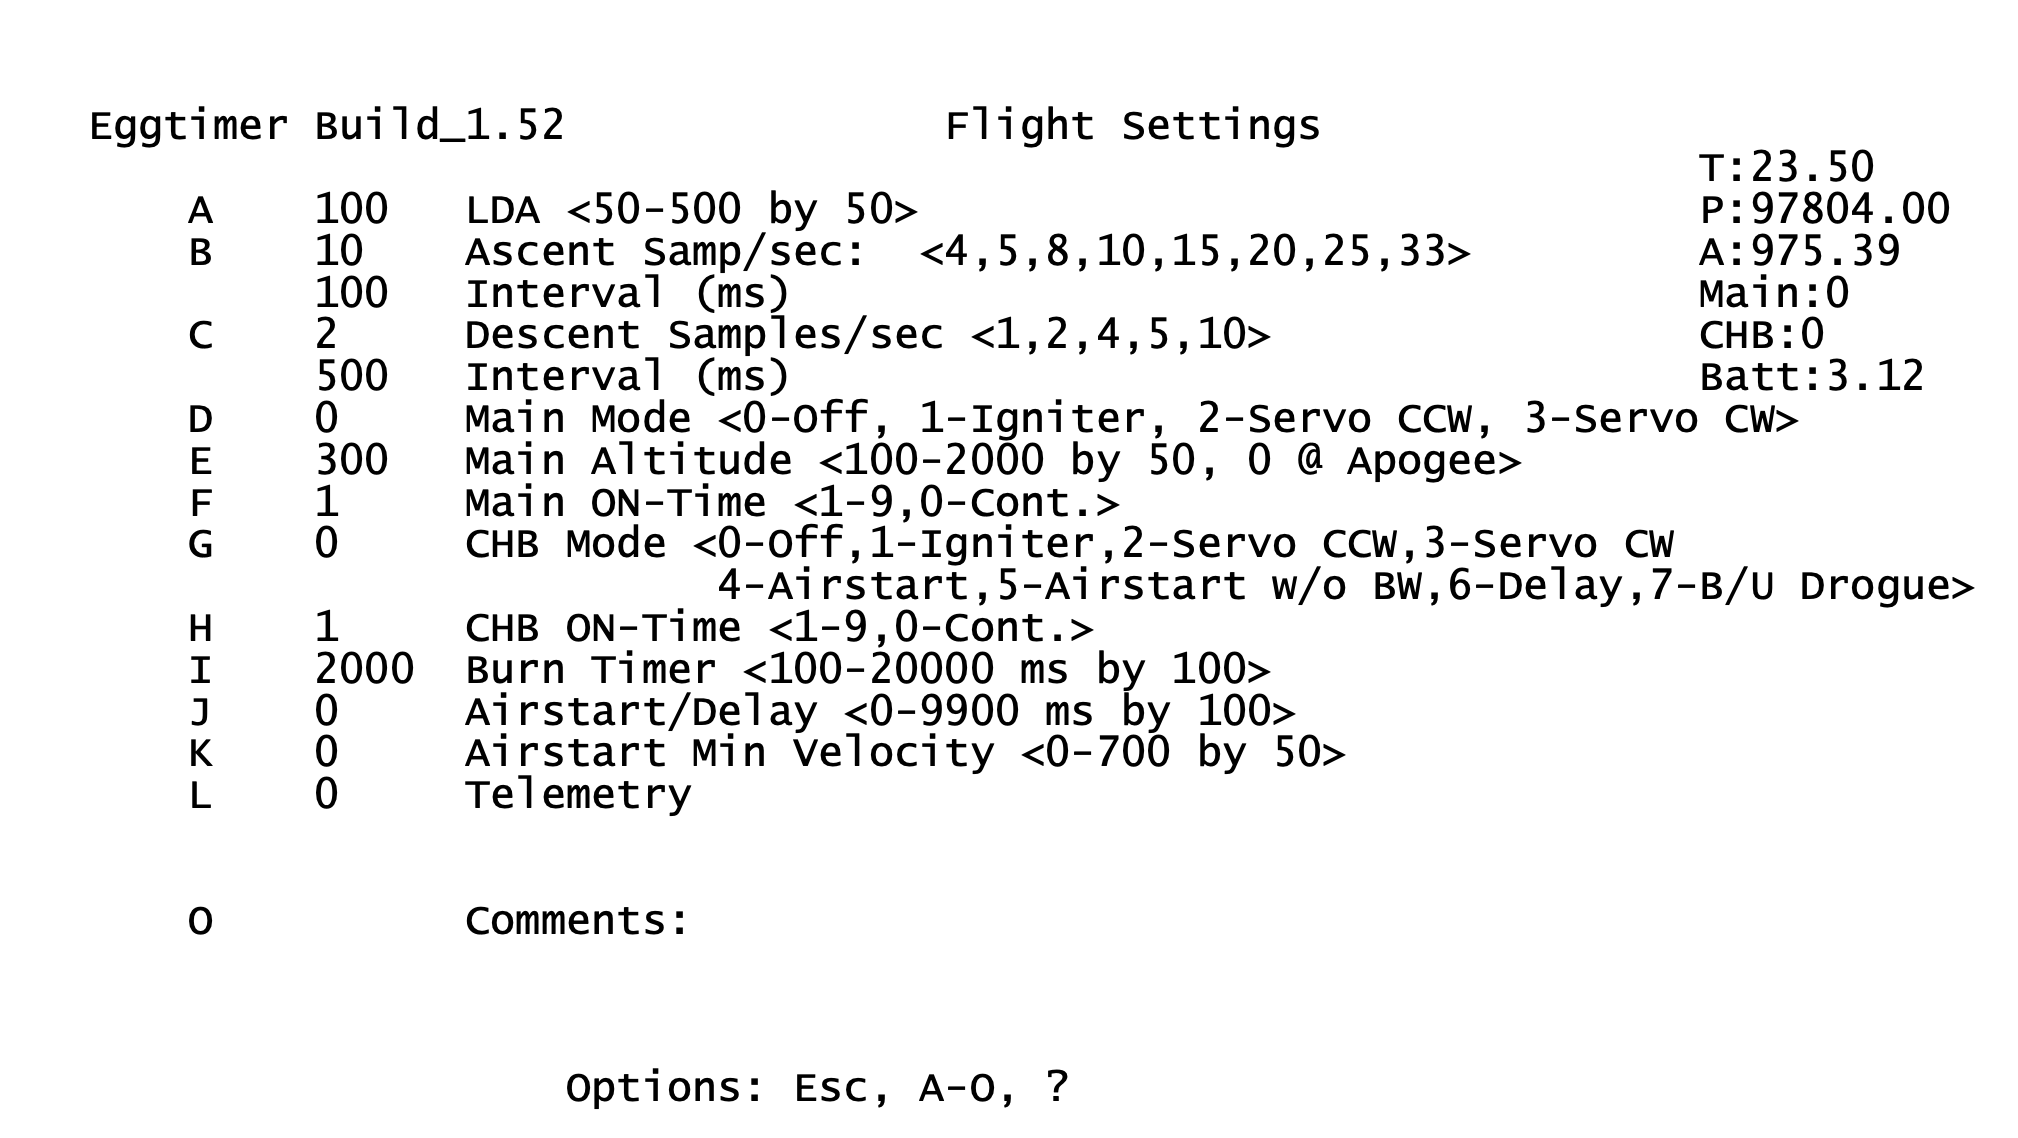
6. In the terminal, press the alphabet that corresponds to the appropriate setting that you wish to change. Press + or - to increase or decrease the settings appropriately. Press enter to input your changes.
N.B. Bear in mind that the settings change according to the intervals that it says within the <>. For example Main ON-Time changes in integer gaps from 0-9, where 0 is continuous.
N.B. if this doesn't appear or it appears kind of scrappily like some numbers are missing just unplug the eggtimer classic, and disconnect it from power. Connect it to power, and then plug it in again, and follow steps 3-6.
N.B. If you are having trouble changing the main on time for example, and it seems like you can't edit it. Just remember, that oyu have to make sure to set Main Mode as non-zero first. (This is particularly the case for Main Altitude and Main on time)
---------------------------
7. Unplug the eggtimer
---------------------------
8. Plug it back in and check that all of the settings have been accepted. If not just change it again.
====================================================
Part 2: How to put it into flight mode.
---------------------------
1. Repeat steps 1-4 in Part 1: How to input flight settings.
---------------------------
2. Don't Press anything, let it go beep-beep, and leave it alone. There should be a blinking light on the flight computer, which indicates that it is armed and flight ready.
N.B. For the record, it is much more intelligent to put the flight computer into flight mode, and then disconnect power, and connect power again to arm the flight computer.
====================================================
Part 3: How to ground test with the flight computer
---------------------------
1. Set up the appropriate settings as shown in Part 1: How to input flight settings.
---------------------------
2. Disconnect the flight computer, don't close down the terminal window
---------------------------
3. Hold the testing button, and plug it in simultaneously. It should have a high pitched continuous tone.
N.B. this can be cumbersome having a second person is very helpful

---------------------------
4. The terminal will display MON>. You enter different keys to determine which mode will be tested.
a. M → Main mode will be tested
b. B → Channel B will be tested, this is the drogue channel.
c. 1,2,3 → AUX channel 1,2 or 3 will be tested.
---------------------------
5. The eggtimer will now have a long continuous warning beep, this is good. Press the testing button, as shown above, to initiate the test. It starts automatically, and tests the channel in the method that has been chosen in the settings.
Useful Links:
http://eggtimerrocketry.com – The website of the guy who made this all of the documentation can be found there.
http://eggtimerrocketry.com/eggtimer-classic-altimeter-support/ – Eggtimer Classic Documentation
http://www.gbrockets.co.uk/store/f-s-e/eggtimer/eggtimer-classic-flight-computer-kit.html – A place you can buy it from in the UK, they didn't work last time I tried.
https://wizardrockets.co.uk – We did manage to go and get some eggtimer classics from them last time.