As one can easily imagine, rocket engineering is a dangerous difficult thing to do. And accurately predicting the outcomes is not always easy (especially for students with limited time or experience) and as such, one of the best ways to validate designs is to simply test them. However given the multitude of things that can go wrong when undertaking tests like these, safety documentation is quite important as it ensures the team is prepared in the event of something not going to plan (which happens quite often), responds properly to said emergency, minimises harmed people, damage to property and whatever else.
Beyond this, as a university student team, tests like this must be signed off by someone (typically academic supervisor and relevant safety officer) and so the Safety Documentation must be extensive, accurate and in the correct format. This page serves as a guide to ensure that the correct documents are filled out for the correct type of tests and that it will be accepted by the required members of staff.
¶ Current Safety Team :
| Head Safety Officers | Junior Safety Officers |
|---|---|
| Philip Tzonev | Jacob Dodridge |
| Tanvi Gir | Lasen Wanni Arachchige |
| Martin England | Pablo Duhamel |
| Timothy van den Wyngaert | Mohammad Kapadia |
¶ Types of Safety Documents
There are a variety of forms, each with a specific purpose. Most of the forms are typically self explanatory but this is not always the case. Furthermore, some safety documents are not explicitly required but still necessary. This section aims to provide brief introductions to each of the major documents and what to consider when filling them out and when they might be needed.
¶ General Risk Assessment:
This is the most important and fundamental document. Every test conducted will require this document. This document contains all the critical information on any tests, such as who is conducting the test, where is it being conducted and what the test actually is.
Sections 1 merely requires the relevants names. The Asessor is actually the person carrying out the activity or an appropriate safety officer. Thus this person is typically a member of ICLR, or someone connected to ICLR. The Approved by and Checked by sections are relevant to Dr. Knoll and Dr. Nigel MacCarthy.
Section 2 requires a brief but detailed description of the activity. This is to inform external members who are unfamiliar with the activity about what is going on, how it will be done and why it is being done. Though not explicity said, it is important to include all this to provide Dr. Knoll and Dr. MacCarthy with enough information about the activity. It should be noted that this section should also be supported by a Standard Operating Procedure (SOP) in case the activity is long and / or complex.
Section 3
merely details the location of the activity. Most tests will be happening at Silwood park.
The most critical aspect of this document is
Section 4.
This is the
Hazards Section
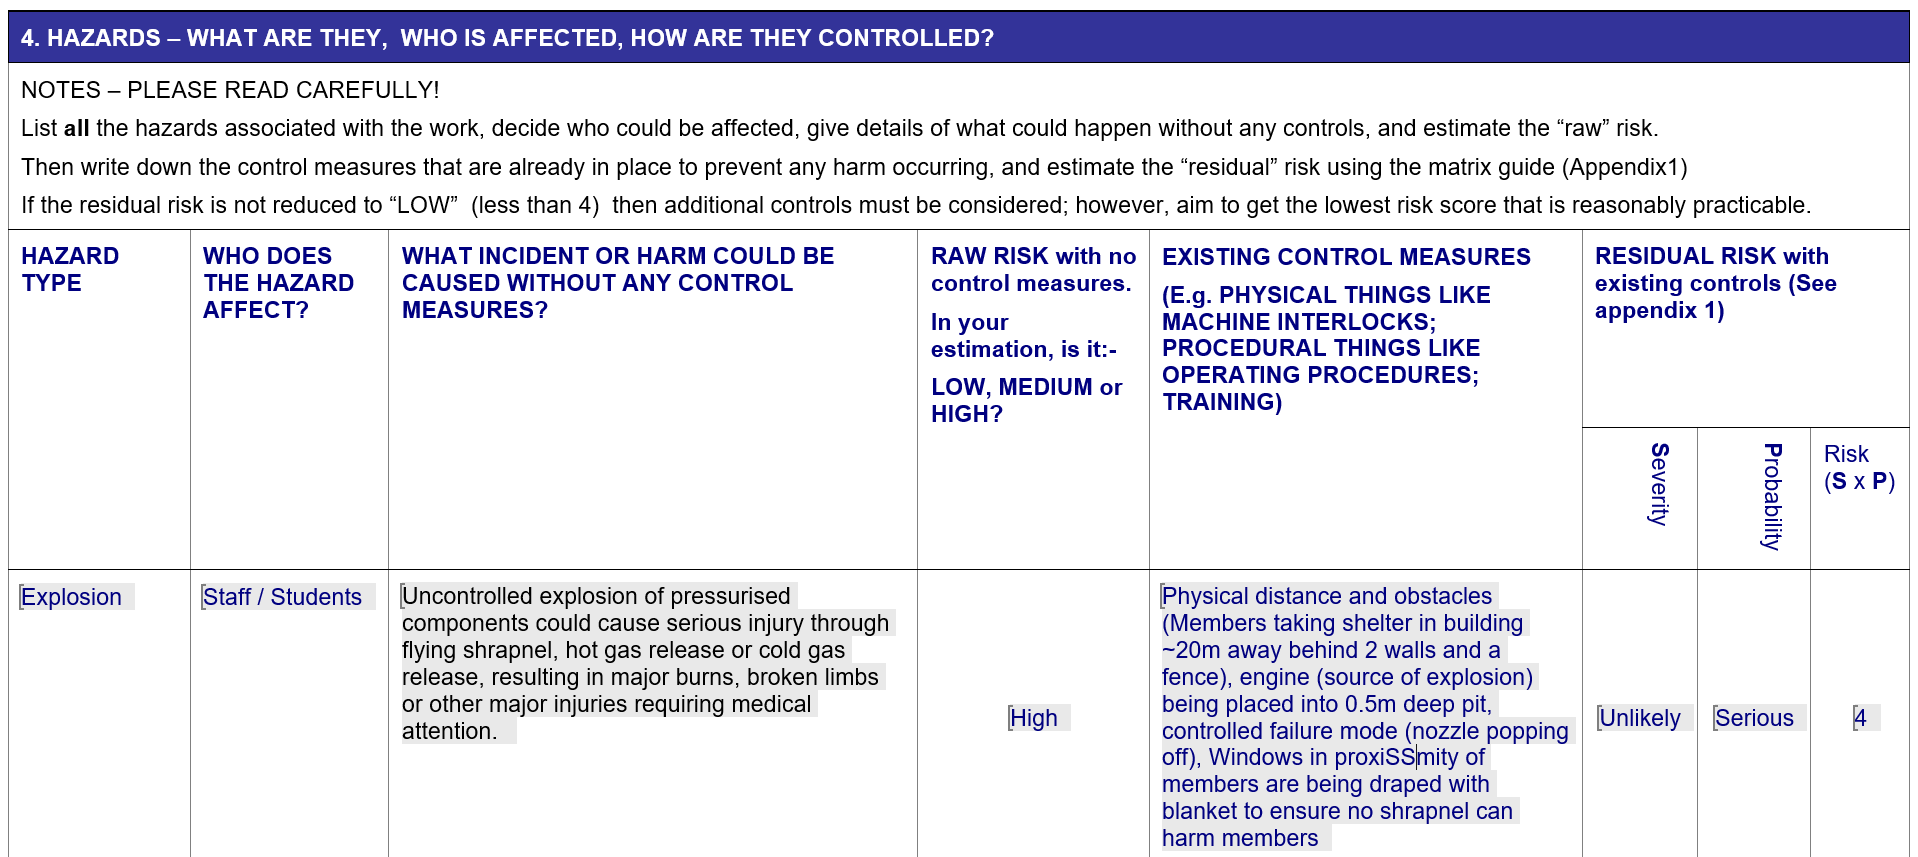
and should contain all relevant information about risks and dangers posed by the test / activity being conducted. The
template above
contains an example of a risk posed by a Propulsion Hot Fire test, as well as control measures that can be used.
Always use your judgement when filling this section out, but be
conservative
. Typically if it's essentially impossible, feel free to neglect it. However in cases where serious injuries can occur, it should be included, even if it's unlikely. Overall, it is
better to overanalyse
rather than underanalyse, however the longer and harder it is to read, the longer it takes to obtain approval.
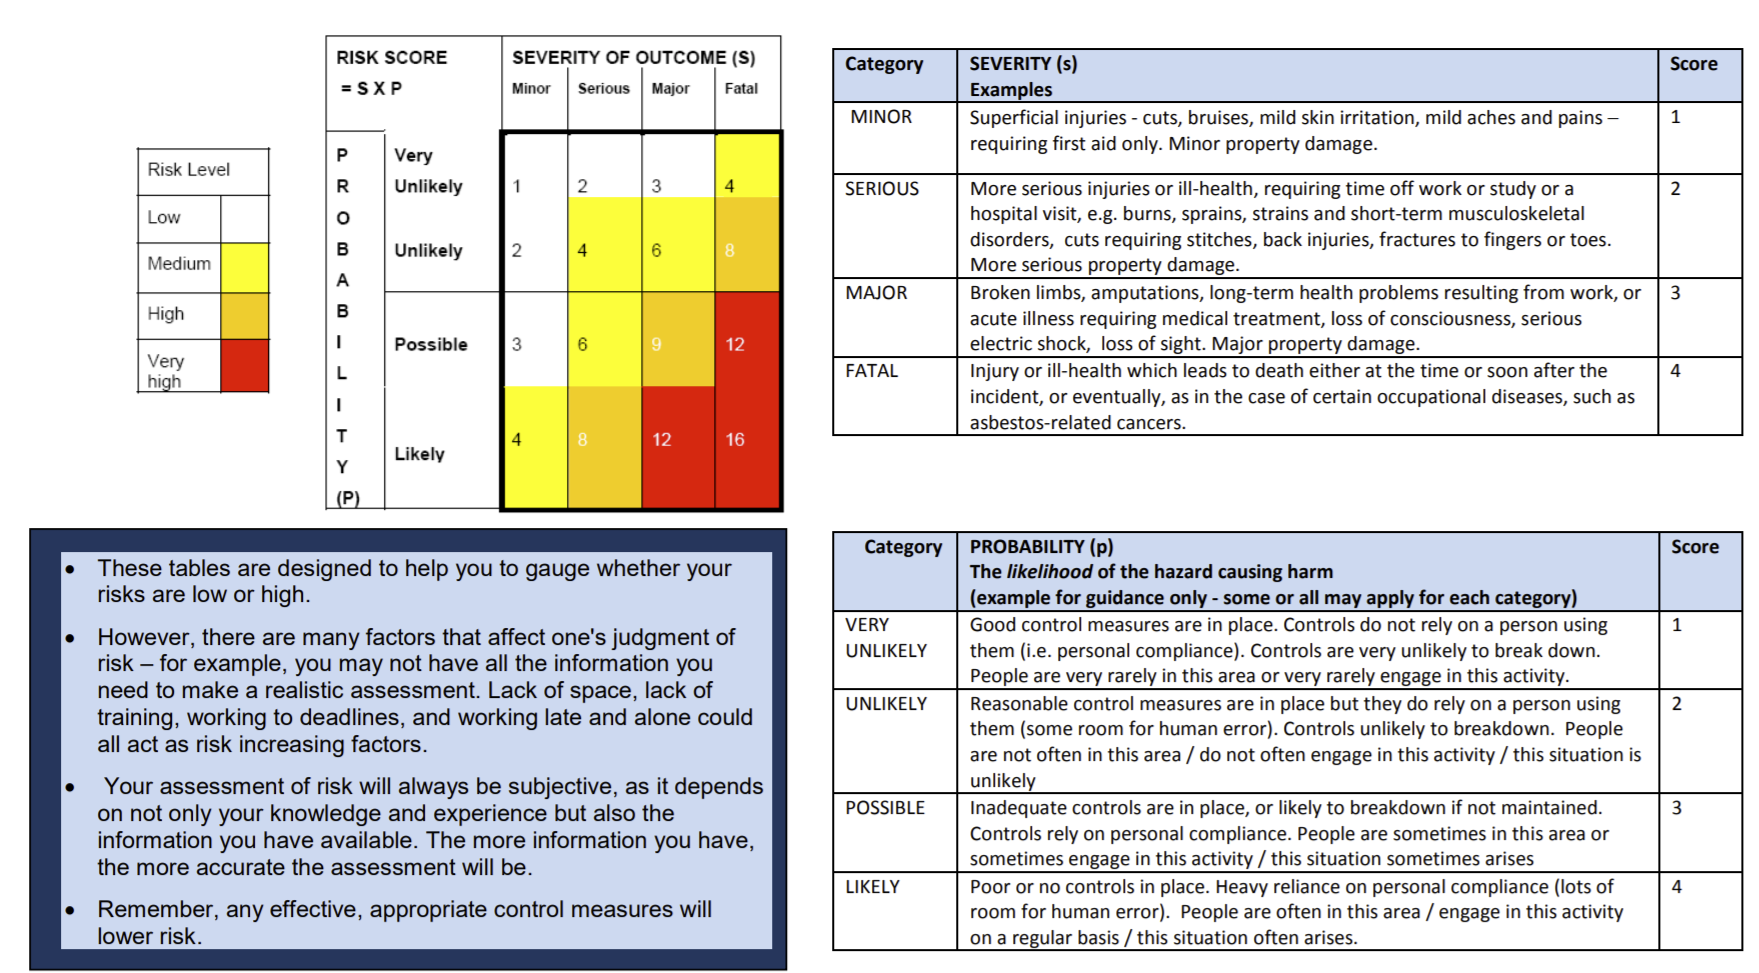
The
Risk
is actually "calculated" in a specific way, using a
risk assessment matrix
. This is provided by the safety department, but also provided here are a more convenient place. The first column is an assumption / guesstimate. It is perfectly acceptable if these risks are high or very high.
The following severity and probability parameters are meant to be evaluated with control measures in place . Here the liklihood should be a 2 or 1. Anything higher implies a lack of proper control or reliability. Thus regardless of severity, a 3 or 4 for probability is unlikely to get approval. Similar for the severity level, major or fatal incidents will never be approved. And if the testing activity cannot take place without these levels of risk, then the procedure should begin anew, changing the experiment to ensure that appropriate levels of safety can be reached.
The control measures column is where the appropriate control measures should be listed to a reasonable degree of detail. This is not a lab report and therefore it does not have to be repeatable , however external members will be reading this and as such, enough detail must be provided that they can properly evaluate the the level of risk.
The remainder of the form is mostly self-explanatory. Section 5 is usually for external control measures or things that are not directly linked to the activity taking place. As an example, for propulsion hot fires, it is customary to notify members of the public around Silwood park 7 days in advance such that if there is a loud noise (i.e. explosive decompression), people are aware of what is going on and will not call the police.
For ICLR activities, we will not conduct lone working activities and therefore Section 6 is just a brief explanation stating "We don't conduct lone working activities, therefore there will be no lone working.".
Section 7 typically calls for a seperate document, however for small activities that do not have a lot of dangers, this section can just have appropriate emergency responses such as "call emergency services" or "Grab a fire extinguisher and put the fire out".
Section 8 is self-explanatory. It specifically states, the RA should be reviewed monthly until extra controls are implemented, and annually thereby after.
Section 9 merely requires the names for other documents that are connected to the general risk assessment.
¶ Emergency Response Procedures:
The emergency response procedure is a document we have created at ICLR and it serves as a checklist or guide of what to do when something goes wrong.
Section 1 and Section 2 are self-explanatory and identical to previous documents.
Section 3 requires some creativity in terms of descriptions, but the main point is to classify them as either minor or major incidents and provide details. This is then used to dictate the appropriate level of response if said emergency were to occur. This is very much a continuation of the FMEA approach when considering safety documentation. The way incidents have previously been split / classified is:
- Minor Incident → Anything abnormal that does not interfere with the functionality of the activity (i.e. no permanent damage) or does not cause any injuries to members
- Major Incident → Anything abnormal that interferes with the functionality of the activity (i.e. permanent damage) or causes harm or injuries to members
Section 4
is where individual safety members can be introduced. This is two-fold. One for the purpose of convenience for writing.
The second aspect is to understand who will be put at risk, what training could minimize this risk and if anyone is on standby in the event of incapacitation of a member.
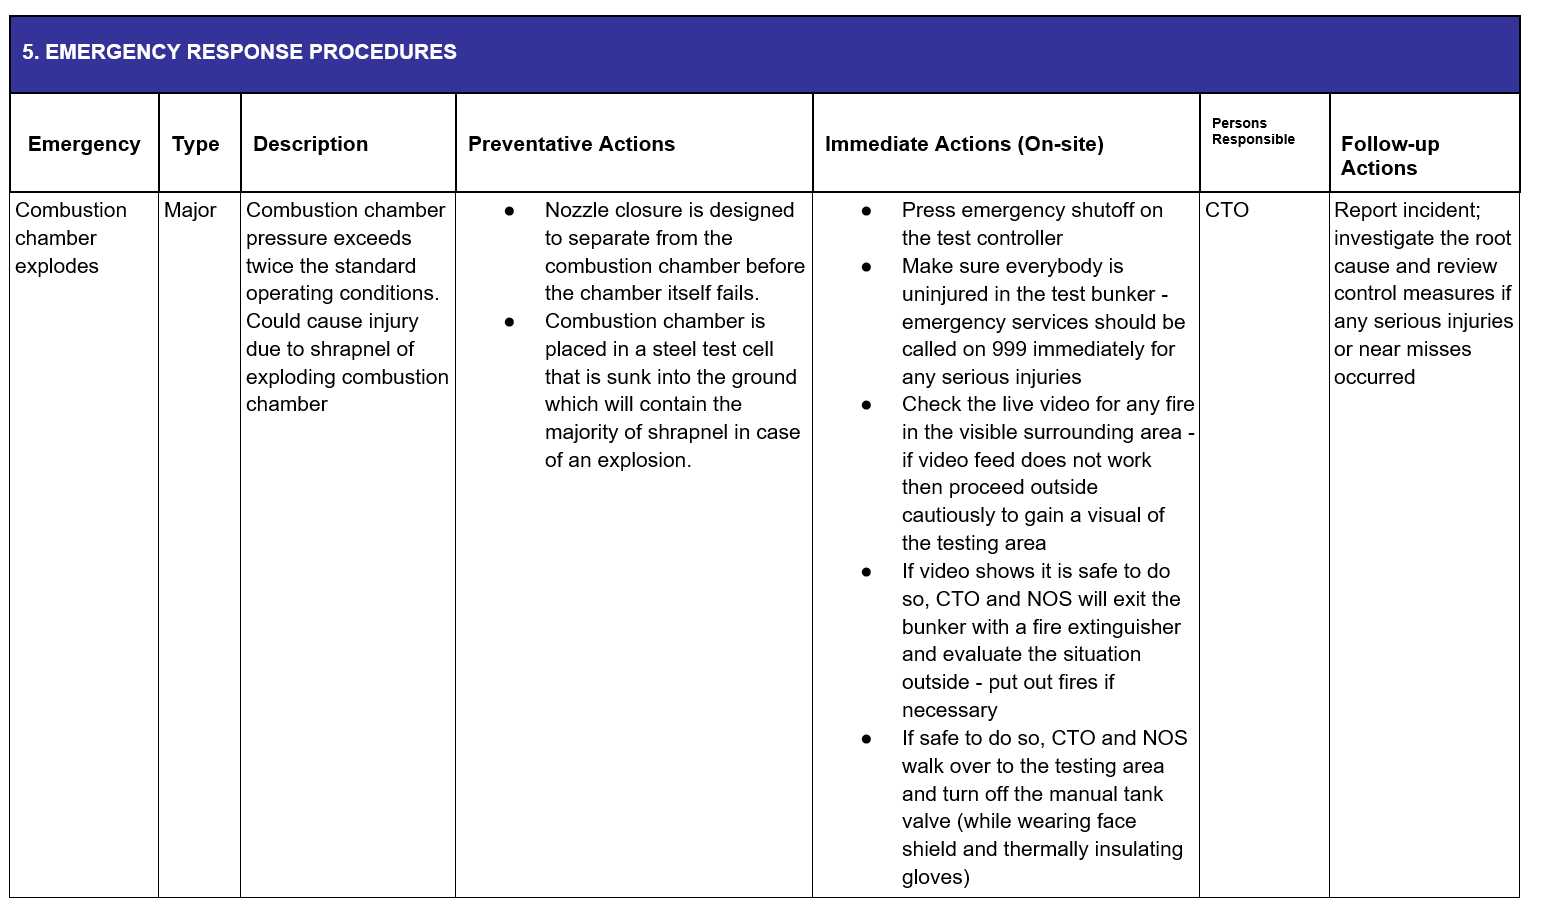
Section 5 is the critical section of this document. The description should outline how harm can occur, in multiple ways if necessary (i.e. something falling can have shards cut someone, the impact could break a bone or the noise cause ear damage). Preventative actions correspond to the control measures on the main risk assessment. Some extra detail can be provided here to properly link the preventative action to the specific failure mechanism from occuring. The next box Immediate Actions details the response in the event of said emergency. These should all follow a similar thread of:
- Evacuate non-essential people from area
- Help anyone who has been hurt
- Initiate any failsafe (i.e. venting or closing valves)
- Call emergency services (if major incident and necessary)
- Remove them if possible from the area
- Clean-up any remaining effects
Below is an example of Section 5
¶ Standard Operating Procedure:
The Standard Operating Procedure is the 3rd part and final part of the fundamental safety documentation for any activity. This should provide a detail overview of the test. Ideally this same document can be printed out and used as a sequential checklist on the day of testing. It is important to add mini-checklists, ensuring everything happens as safely as possible. There is no standard template for this and so the propulsion document has been given instead. This is a comprehensive overview of how to write such a document. While there is freedom, SOPs should typically adhere to the following structure:
-
Title Page
- Brief Description
- Nomenclature (not always necessary)
- Transit Advance Checks (Only necessary if outdoors and weather or time dependent
- Critical Test Operations Summary
- Responsible Test Engineers (List critical members who have important functions on the day of testing)
- Before Starting Operations Section
-
Critical Test Operations
- Include checklists before "dangerous actions" to ensure all control systems are in place
- Break down steps as much as possible into single actions
- Begin new series of steps after each major checkpoint (i.e. if set-up is down, start steps from 1 again)
-
Include detail in steps as sub-bullet points
- Like this: Mr. Engine must be wearing appropriate PPE
- Mr. Engine should open the valve slowly to prevent water hammer
- If something is stuck, Ms Nosecone should gently apply pressure using the rubber end of the screwdriver
- Make it so simple and easy to follow, a toddler could do it
- Teardown Procedure
- Equipment Checklist
Even this structure is flexible, but again, use your engineering skills to think of the best way to present this and make it easy to follow in a potentially high stress environment.
¶ COSHH:
The COSHH form is a special safety form for chemicals of any kind and must be completed when using chemicals for a test. Obvious exceptions to this are water and air, as these do not exhibit any special properties that make them a greater threat than normal. It should also be noted, that just because a COSHH form is completed, that chemical dangers can be omitted from other safety documentation. The Risk Assessment must include dangers of all kind. The primary purpose of a COSHH form is to assist in identifying hazards and essentially letting college staff know that we are aware of the substances we are dealing with.
The introductory section is self-explanatory. It is meant to give the COSHH assessor an idea of who is conducting the experiment, what experiment is taking place and why it is taking place .
Section 1
requires some external support. Chemical safety sheets must be used to identify the associated
hazard statements
.
This website
provides detail on various hazard statements, however the
supplier's safety sheet
normally lists explicitly which codes apply to the substance in question.
A score between 1 and 3 is assigned for each of the 3 categories (Health hazard, Dustiness or Volatility and Quantity). These 3 scores are multiplied together to estimate the overall risk level.
PLEASE NOTE: The table provided is a GUIDE to allow you make an informed decision on what score you assign each section. Not that the chemical species has all the listed hazard statements applied.
The remainder of
Section 1
is self-explanatory.
Section 2 deals with control measures and primarily consists of "yes or no" questions. The later aspects of the sections deal with control measures and the risk assessments can be used here to provide detail (Feel free to copy / paste and provide relevant detail for the COSHH).
Imperial also provides a useful webpage with considerations and recommendations when conducting risk assessments for hazardous chemicals.
Risk Assessments for Hazardous Chemicals
¶ Fieldwork Risk Assessent:
This form is used whenever activities are conducted away from South Kensington Campus
but only on imperial property.
If conducting a test in conjunction with UKRA (as an example), they may have seperate safety documentation that they want filled out as opposed to this.
Hence this form is primarily used for
Silwood Testing activities.
¶ Appendix A: How to identify hazards using the Failure Modes and Effects Analysis (FMEA) Methodology
An easy way to identify hazards is to generate a basic procedure and ask at each step,
how that step could fail
. As an example, let us make a cup of tea. We shall outline the following procedure for making a cup of tea:
(This will probably be a bit strange but please bear with me, this is a good example of Failure Modes and Effect Analysis (FEMA) Engineering, a common practice in the industry)
| Step | How it could go wrong | How could someone get hurt | Possible Ways to avoid this (Control Measures) |
|---|---|---|---|
| 1. Collect mug, kettle and tea leaves |
Mug or kettle drops and breaks
Leaves are greasy / slimey and slide out of grip |
Falling objects could break bone or hurt someone
|
Wearing steel-toed boots Wearing gloves when handling shards Rubber / softer floor Ear Protection No one walks by until area is cleaned |
| 2. Place mug and tea leaves to the side |
Mug drops
|
Falling objects could break bone or hurt someone
|
Wearing chemically protective gloves |
| 3. Pour water into kettle |
Water spills everywhere
Kettle drops onto foot or breaks |
Clothes get wet, person wearing said clothes gets wet. If it is cold, person might get sick. The usual falling consequences. I will avoid repeating myself |
Wearing some type of apron, boiler suit or lab-coat |
| 4. Place kettle onto stove / burner |
Miss stove and pour water over self
|
Someone walking by can slip on wet surface |
|
| 5. Turn on heat |
Short circuit (Stove)
No signal (Stove) Gas leak (Burner) |
Short circuit has many effects, ranging from minor pain to fatality No signal means stove is not working and is non-responsive, regardless if on or off Gas leak could result in asphyxiation or explosion |
Wearing insulative gloves Fire Extinguisher Inspections prior to turning on burner |
| 6. Wait for water to boil | Overpressuisation results in lid flying off | Flying lid could hurt someone or break bones or cut someone |
Some type of non-shattering shield Face shield |
| 7. When water is boiling, remove from stove |
Kettle is too hot to touch
|
Burning hand Boiling water can burn other limbs Wet surface is slippery |
Thermally insulating gloves Long sleeves and other PPE |
| 8. Pour water into mug |
Water spills
Inaccurate calculations mean more water is poured in than the mug has capacity Thermal shock occurs and mug shatters |
Burning hand or other limbs Water can overflow and cause burning or any other injuries outlined previously |
|
| 9. Steep tea leaves in mug for 2 minutes |
Leaves are not removed in time
|
Leaving the leaves in for too long can ruin the tea Usual spillage risks Leaves remain in for too long and cause variety of effects, including injuries when someone attempts to remove them |
|
| 10. Remove tea leaves |
Tea leaves are hot and burn you
Transfer method fails and leaves drop somewhere |
Burned hand or limb Wet toxic leaves provide slippage opportunities or other adverse health effects |
|
| 11. Pour in 1 tsp of sugar |
Sugar spills everywhere
Container for sugar drops Spoon is dipped into tea and conducts heat |
Spillage effects Falling object effects Burning hand |
|
| 12. Pour in 10 ml of milk |
Milk spills everywhere
|
Spillage effects Milk contaminates tea making it inedible or if toxic Milk ruins tea, ruining the entire procedure |
|
| 13. Wait ~3 minutes for tea to cool |
Not enough time for tea to cool down
Milk, sugar and tea don't mix well enough |
Burning effects Results of the procedure are skewed |
|
FMEA is an technique commonly used when designing components. The idea is to think of every possible way, no matter how stupid, an object can fail, and then account for said failure mechanism in the design. Naturally trade-offs are made as certain impossible failure modes may call for ridiculous solutions. The same can be done for safety procedures and experimentation. It is critical to consider every way each step in the procedure may fail, no matter how ridiculous. From here, how this failure can harm people can be identified and possible control measures can be created. Another methodology to employ here is Keep it simple stupid (KISS). Sometimes the solution / control mechanism is "avoid having other people walking by" rather than a complex machine that ensures the area is vacated before progressing. If you're ever unsure, run it by a friend or another safety officer and see what they think. There are no right or wrong answers here. This is simply meant to be the starting point.
As you can see, a few of the failure modes are quite a stretch and near impossible to happen. In a risk assessment, these hazards should naturally be removed. However if you are ever unsure of how to begin analysing an activity with the intention of performing a risk assessment, you can begin with this process. This also serves as the starting point of emergency response procedures where you consider what happens if a hazard occurs despite using control measures.


